どうも、僕の作り方では、UIViewControler が長くなる傾向がある。引きづられるように、各クラスのソースも長くなる。そうすると、メンテナンスがやりにくい。困ったものだ。ちょっと、変更がかかっただけでもソースを見つけるのに時間がかかる。
もちろん、ソースの配置は階層構造をとっているから、目的のファイルにはすぐにたどり着ける。問題は、あくまでも、ソースファイルの中のコードの長さ。いや、長さというより、メソッドの多さ。
イベントドリブンとして記述できるが Objective-c の素敵なところなんだけど、整理ができてないとあちこちのメソッドにジャンプするので時々に追いかけにくい。もちろん、メソッドの名前にはそれなりに気をつかっているつもりだが。
そんなこともあり、Objetive-Cの機能として提供されているClassのカテゴリを使って、アニメーションを別ファイルに書き出し、まずはBlocks処理を多用するアニメーション部分のソースコードをスッキリさせるようにした。
わりと簡単。しかも便利。
BallViewというUIViewクラスをアニメーションさせる例で説明します。
やりたいことは、ボールを中央から右に動かして中央に戻すを2回繰り返す。
mainViewにBallViewを追加してアニメーションさせることが目標。
mainViewはStoryBoardで IBOutlet をしているものとする。この辺りがわからない方には説明不足な部分も出るかもしれませんがご了承下さい。
まずは、クラスカテゴリファイルの作り方から
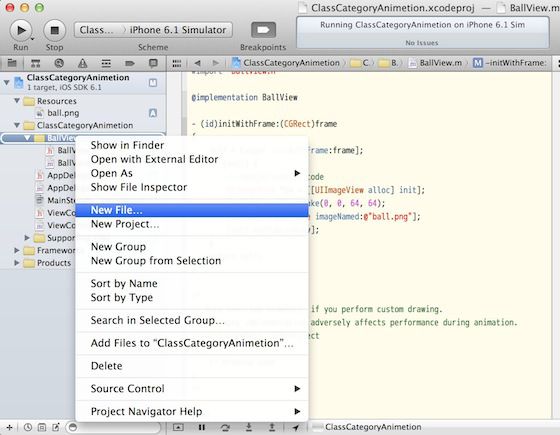
右クリックをして「New File」
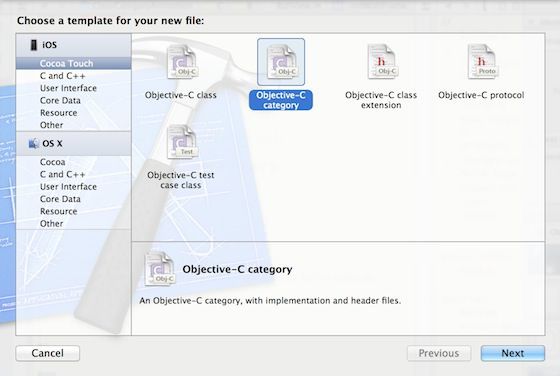
Choose a template for your new file:が表示される
「Objective-C category」を選択して「Next」ボタンをクリック
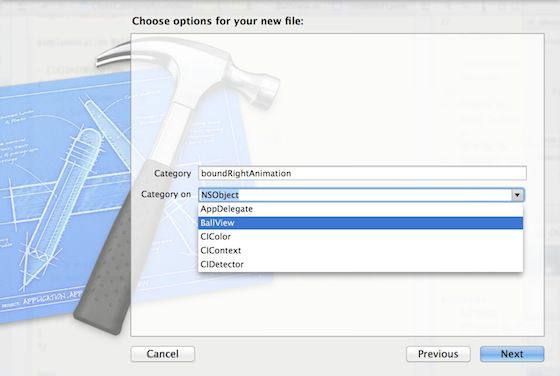
Choose options for your new file:が表示される
1. Category に 任意の名前を入れる。
2. Category on からカテゴリを作成したいクラスを選ぶんで「Next」ボタン
Categoryの名前にクラス名をつけるべきか悩むと思いますが、うまく処理されますのでつけなくて大丈夫です。(後述)
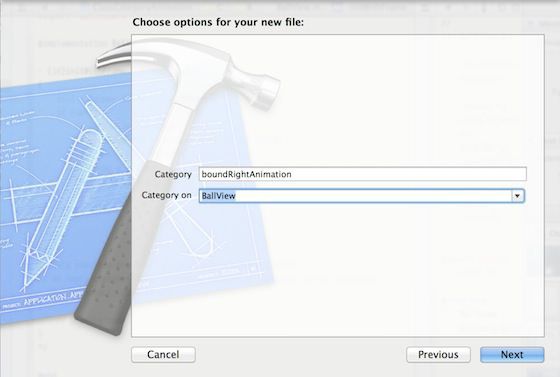
Project Navigator に
「BallView+boundRightAnimation.h」「BallView+boundRightAnimation」が追加されました。
ファイル名はクラス名+Categoryになっています。
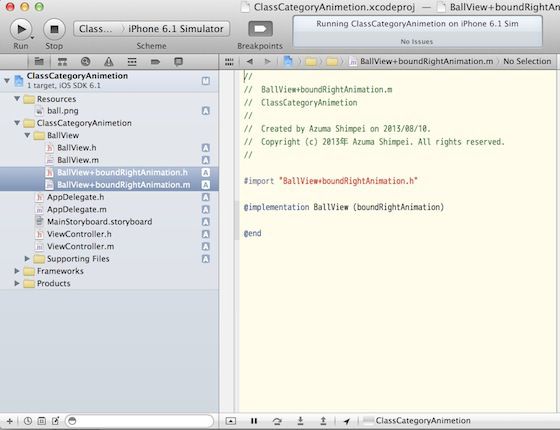
まず、ヘッダファイルをみてみましょう。
|
1 2 3 |
#import "BallView.h" @interface BallView (boundRightAnimation) @end |
クラスカテゴリは 「@interface クラス名 (カテゴリ名)」 で表記します。これで、BallViewに属することになります。継承ではないのでインスタンス変数をカテゴリ内で宣言できません。宣言する場合はクラスに記述しましょう。この場合は「BallView.h」に記述します。
クラスカテゴリは、クラス拡張としても使えます。UIViewにメソッドを追加することも可能です。
それでは、アニメーションさせる記述を書いていきましょう。「BallView+boundRightAnimation.h」に外部からアクセスできるメソッドを宣言します。
|
1 2 3 4 |
#import "BallView.h" @interface BallView (boundRightAnimation) -(void)startBoundRightAnimetion; @end |
次に「BallView+boundRightAnimation.m」にアニメーションのプログラムを記述します。
|
1 2 3 4 5 6 7 8 9 10 11 12 13 14 15 16 17 18 19 20 21 22 23 24 25 26 27 28 29 30 31 32 33 34 35 36 37 38 39 40 41 42 43 |
#import "BallView+boundRightAnimation.h" @implementation BallView (boundRightAnimation) -(void)startBoundRightAnimetion { // scean no. 10 animetion [self BoundRightAnimetion_s10]; } -(void)BoundRightAnimetion_s10 { // overwrite default position in Completion CGRect master = self.frame; [UIView animateWithDuration:0.3f delay:0.0f options: UIViewAnimationOptionAutoreverse animations:^{ CGRect tmp = self.frame; tmp.origin.x = tmp.origin.x+40.0f; self.frame = tmp; } completion:^(BOOL finished){ self.frame = master; [self boundRightAnimetion_s20]; } ]; } -(void)boundRightAnimetion_s20 { // overwrite default position in Completion CGRect master = self.frame; [UIView animateWithDuration:0.1f delay:0.0f options: UIViewAnimationOptionAutoreverse animations:^{ CGRect tmp = self.frame; tmp.origin.x = tmp.origin.x+4.0f; self.frame = tmp; } completion:^(BOOL finished){ self.frame = master; } ]; } @end |
UIView animateWithDuration を二回実行していいるだけです。8回ぐらい実行するようにしても大丈夫です。
あとは、「ViewController」でコントロールします。
まず、「ViewController.h」に #import を追加します。
|
1 2 3 4 5 6 7 8 9 10 |
#import <UIKit/UIKit.h> #import "BallView.h" #import "BallView+boundRightAnimation.h" @interface ViewController : UIViewController { BallView* ball; } @property (strong, nonatomic) IBOutlet UIView *mainView; @end |
「ViewController.m」から「startBoundRightAnimetion」を呼び出すようにしたら完成です。
今回は、ViewDidLoad内で直接呼び出します。
|
1 2 3 4 5 6 7 8 9 10 11 12 13 |
- (void)viewDidLoad { [super viewDidLoad]; // Do any additional setup after loading the view, typically from a nib. // mainView AddSubview Ball // mainView created by storyboard // ball is BallView Class in header file ball = [[BallView alloc] initWithFrame:CGRectMake(128, 208, 64,64)]; [self.mainView addSubview:ball]; [ball startBoundRightAnimetion]; } |
あとは、実行して確認すれば終わり。
これで、UIViewControllerはコントロールに専念し、BallView内のコードもスッキリ。アニメーションは増えるた度にカテゴリでつかしてらくらく管理です。
おわり

コメント